Why We Need Good READMEs
Your README is often the first impression someone has of your project.
A great README can be the difference between someone moving on or choosing to engage with your project. When developers land on your repo, they’re asking themselves: “Is this worth my time?” Developers routinely make judgments within seconds, deciding whether to dig deeper or move along. A clear, well-structured README signals that the project is maintained, the author cares about the developer experience, and the barrier to entry is low.
Think of it this way: you’ve spent hours, days, maybe months building something valuable. Don’t let these efforts go to waste because your README doesn’t do justice to your project.
Skip to the checklist and prompt at the bottom if you want a quick reference.
What You Need From Top to Bottom
1. Project Name
Make it clear and prominent. This seems obvious, but many repos bury the actual project name.
2. Visual Demo or Banner
If applicable to your project, include a short GIF or image that conveys the project’s value or brand. Keep it as brief as possible abd aim for under 10 seconds for GIFs.
Why its important: People process visuals faster than text. A quick demo can communicate what paragraphs of explanation cannot. Place it right after the name as a visual hook, linking to higher quality demos doesnt hurt in my view.
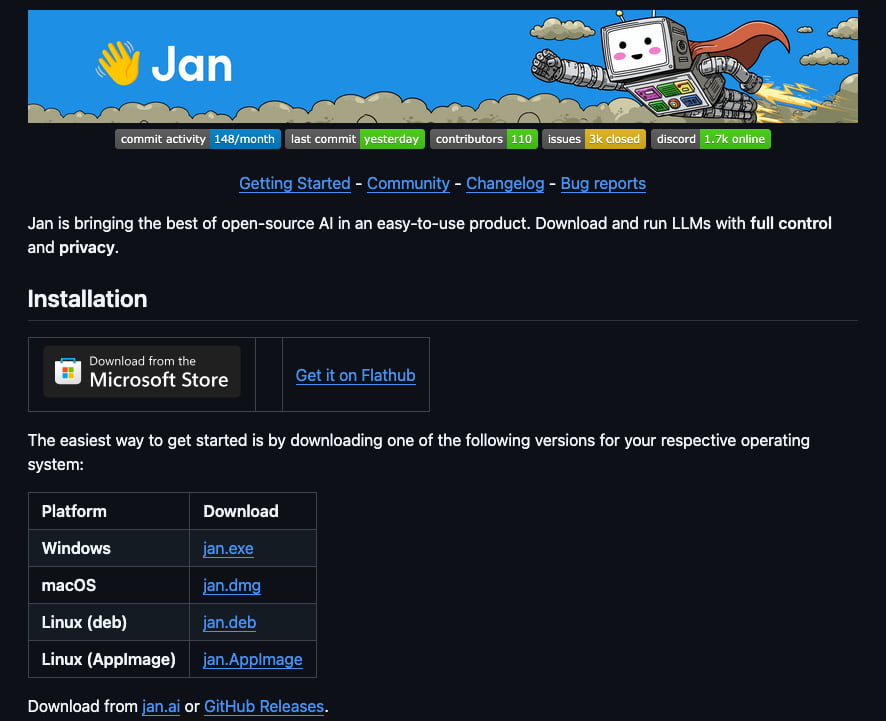
Example banner from Jan, an open-source offline chatbot application.
3. Badges
Badges provide dynamic, highly relevant info about your project at a glance.
Best practices:
- Don’t use more than 5 too many badges=too much noise
- Use meaningful alt text if the badge service is slow or down, users will see your alt text instead
- Priorities vary by project: license, current version, build status, community stats/link… think about what matters most for project signal and what top level information readers will want to see.

Example badges from NVIDIA Dynamo.
4. Table of Contents
If your README is long, add a TOC to help readers navigate.
## Table of Contents
- [Quick Start](#quick-start)
- [Usage](#usage)
- [Getting Help](#getting-help)
- [Contributing](#contributing)
5. Elevator Pitch
1-2 sentences on what your project does. Be laser-focused so people can quickly understand the value. Do your best to avoid jargon or buzzwords, even if your project is blazingly fast.
❌ “A comprehensive solution for managing various aspects of your application’s state management needs across multiple platforms and environments.”
✅ “Dead-simple state management for React. One hook, zero boilerplate.”
6. Quick Start / Getting Started / Installation
How to get your project running in all relevant environments. This is where many READMEs fail—they assume too much knowledge or skip steps. Run through this with contributors and members of your community who are new if they are willing. This is a great way to establish relationships with newcomers, make them feel welcome. Treat the meet like a UX research session. Dont tell them what to do or guide them, let them fail and note the friction points.
Include:
- Prerequisites (Node version, dependencies, etc.)
- Installation commands
- Verification that it’s working
- Any environment-specific notes (Windows vs. Mac vs. Linux, etc.)
## Quick Start

### Prerequisites
- Node.js 18+
- npm or yarn

### Installation
\`\`\`bash
npm install your-package
\`\`\`

### Verify Installation
\`\`\`bash
npx your-package --version
\`\`\`
7. Usage Examples
Provide basic examples with links to your docs for deeper dives or more complex use cases.
Keep examples:
- Copy-pasteable
- Minimal but functional
- Progressively complex (basic → intermediate → “see docs for advanced”)
## Usage

### Basic Example
\`\`\`javascript
import { thing } from 'your-package';

const result = thing.doStuff();
console.log(result);
\`\`\`

For more examples, see the [documentation](https://your-docs-site.com).
8. Getting Help
Direct people to the best channels for support. Community forums, Discord, GitHub Discussions, etc.
⚠️ Important: Think about where your support lives and what you can realistically maintain long-term. Be very transparent about support expectations.
Support is a marathon, not a sprint. Responsiveness is critical to a project’s health. Take a moment to note how Blender’s community grew as their response times improved:
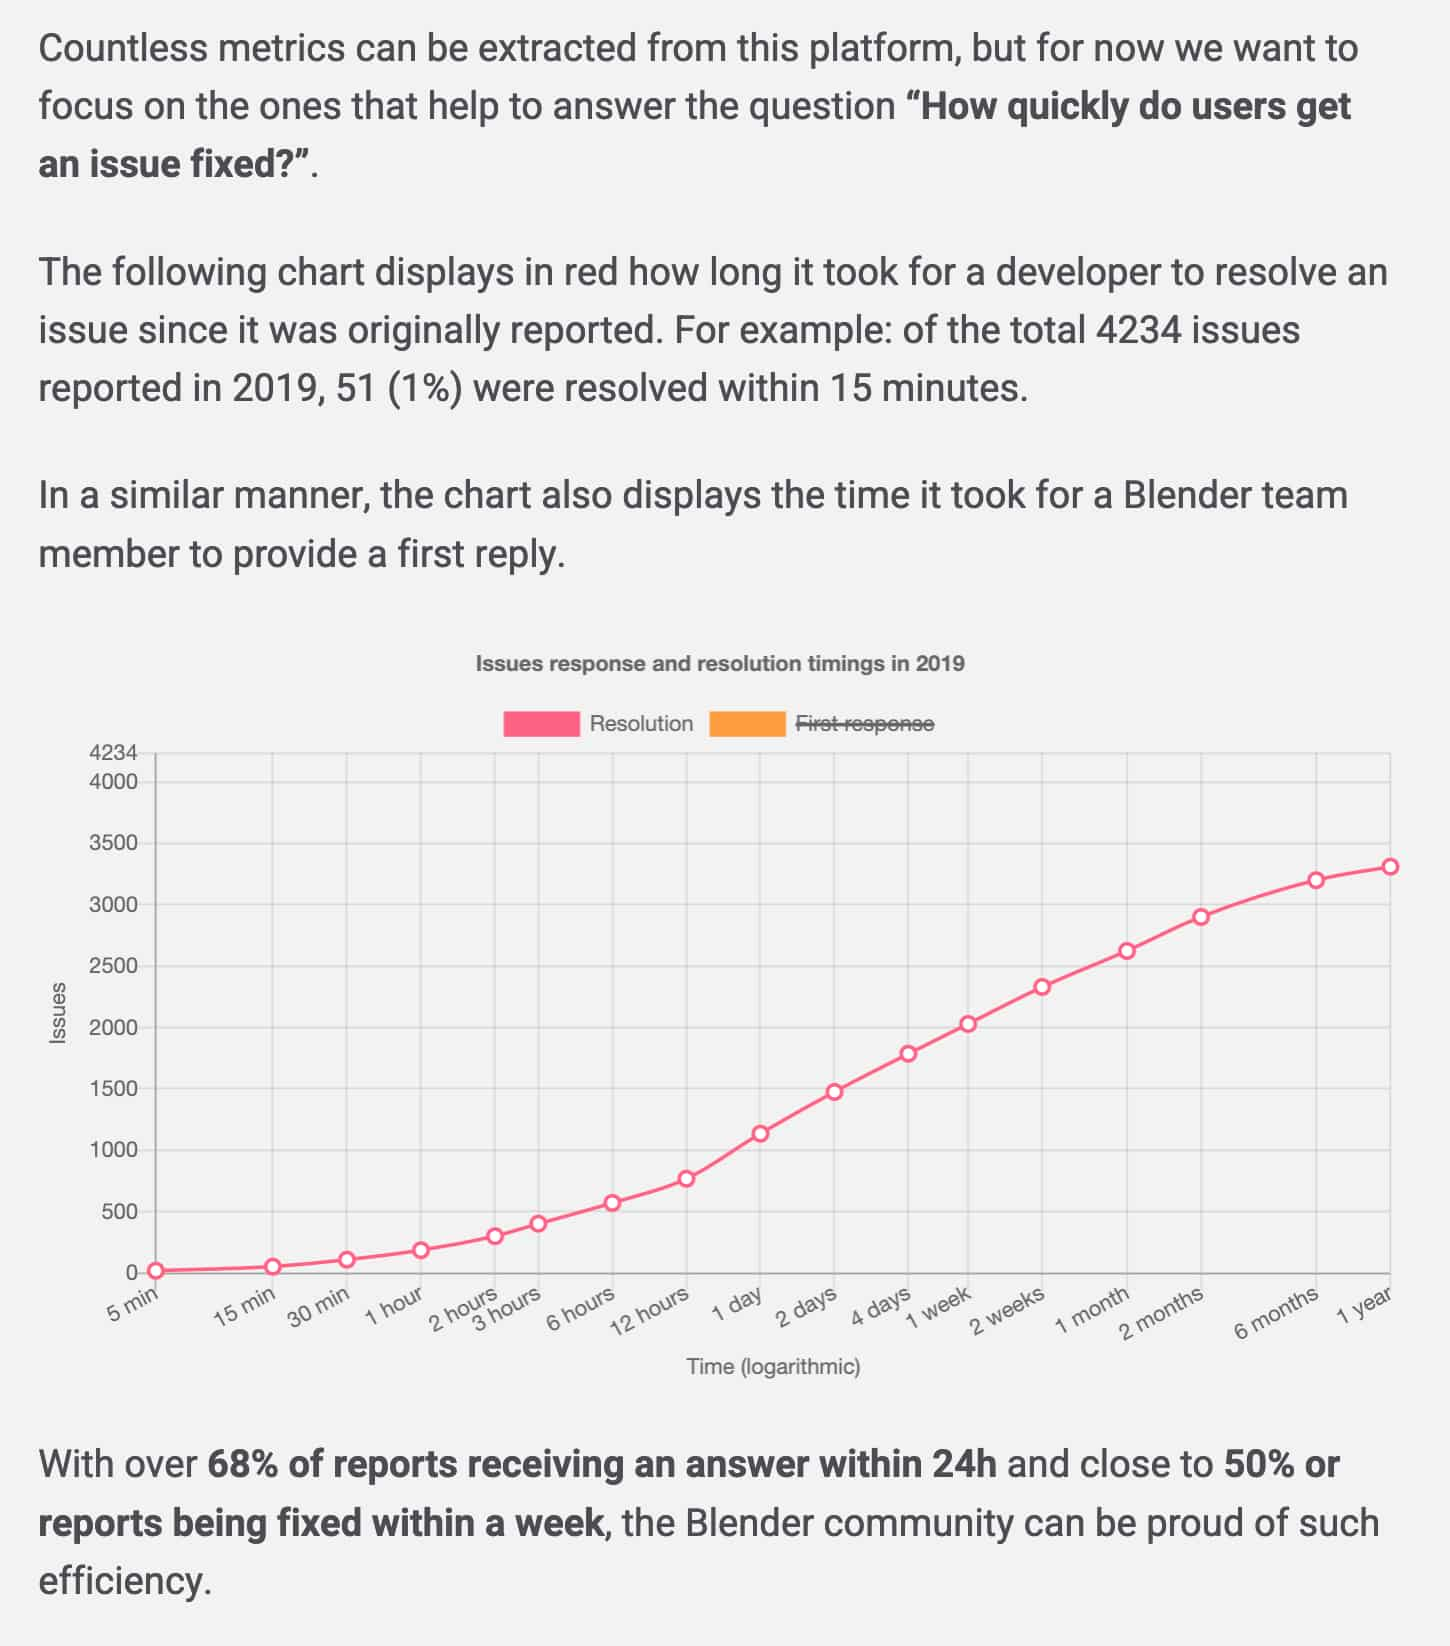
Blender’s commitment to fast response times directly correlated with their community growth. Quick, helpful responses build trust and encourage contribution.
9. Links to Supporting Docs
End your README by linking to the important supporting documents:
CONTRIBUTING.md
Guidelines for how others can contribute to your project. Include coding standards, PR process, and how to set up a development environment.
LICENSE
The legal terms under which your project can be used, modified, and distributed. Choose one that fits your goals (MIT, Apache 2.0, MPL, etc.).
CODE_OF_CONDUCT.md
Sets expectations for community behavior. This is important if you are running a community. The Contributor Covenant and Mozilla Community Participation Guidelines are popular choices for inspiration.
ROADMAP.md
Share your vision for the project’s future. Helps contributors understand priorities and find meaningful ways to help.
AGENTS.md
Instructions for AI coding agents (like GitHub Copilot, Cursor, or Claude) on how to work with your codebase. Include project structure, conventions, and context that helps AI tools generate better code for your project.
TL;DR Checklist
README Checklist
Prompt a README Consultant
Want help improving your README right now? Copy the prompt below into your favorite AI assistant, then paste your current README when asked.
You are a README improvement assistant for open source projects. Your goal is to help maintainers create clear, welcoming, and effective READMEs that encourage adoption and contribution.

First, ask me to paste my current README (or I'll say "none" if starting fresh).

Then, ask about my goals:
1. What does my project do in one sentence?
2. Who is my target audience? (developers, designers, end-users, etc.)
3. What's my primary goal: more users, more contributors, or both?
4. Where do I want to direct people for help? (Discord, GitHub Issues, Discussions, etc.)

Based on my answers and these README best practices, suggest specific improvements section by section.

**README Structure (top to bottom):**
1. Project Name — Clear and prominent, anchors everything that follows
2. Visual Demo/Banner — Short GIF or image showing the project in action (under 10 seconds for GIFs)
3. Badges — Max 5: License, version, build status, community link (use meaningful alt text)
4. Table of Contents — Only if README is long
5. Elevator Pitch — 1-2 sentences, no jargon. What problem does it solve?
6. Quick Start — Prerequisites, install commands, verification steps. Assume nothing.
7. Usage Examples — Copy-pasteable, minimal, progressively complex
8. Getting Help — Where to ask questions. Be realistic about response time expectations.
9. Supporting Docs — Links to CONTRIBUTING.md, LICENSE, CODE_OF_CONDUCT.md, ROADMAP.md, AGENTS.md

**Key principles:**
- Developers decide in seconds whether to engage—make it count
- A good README signals the project is maintained and welcoming
- Avoid jargon and buzzwords
- Quick start guides should be tested with newcomers
- Support is a marathon, not a sprint—be honest about expectations

Walk through each section, offering specific rewrites. Ask clarifying questions as needed. Output the final improved README in markdown.